Monday, March 25, 2013

Get Caught Up Day


Today we will use the time to make sure we are current on all our work.  I will facilitate around the room to help you all individually.  All instructions for for all the assignments are listed at the bottom of the blog page.


Wednesday, March 20, 2013

Business Card Design


Today we are going to design a business card of the career of our choice.

1.  Log in and go to www.VistaPrint.com

2.  Go to Business Cards Tab and select FREE BUSINESS CARDS


3.  Select the industry of your profession


4.   Enter your information in the fields to the left. 


5.  After you have entered your information click next, then right click on the image and right click Save Picture As, and save the file as Business Card in your Portfolio folder


6.  Be sure to post your business card on your Edublogs.org page and title it Business Card


Tuesday, March 19, 2013

Microsoft Excel Spreadsheet: Carl's Sneaker Shop

Carl's Sneaker Shop

Today we are going to be building a spreadsheet for Carl.  He owns a sneaker shop in Peekskill, NY [I know, right?] and would like to figure out how much he should pay his employee's every month.  He has trouble figuring out their commission, their taxes, and their net pay.

This is as far as Carl got when he gave up:


A
B
C
D
E
1
Carl's Surf Shop


2
Commission Worksheet


3


4
Sales Rep
Sales
Commission
Taxes
Net Pay
5
James Thomas
 $ 45,000.00 


6
Jerrod Sanchez
 $ 60,000.00 


7
Steve Harrison
 $ 56,000.00 


8
Leah Larkin
 $ 34,000.00 


9
Casey Perkins
 $ 29,500.00 


10
Bert Dillon
 $ 27,500.00 


11
Miranda Parkinson
 $ 43,250.00 


  1. Highlight the information in cells A1+A2 and change the font style and size.
  2. Highlight the column titles:  Bold & center them.
  3. Use a formula to calculate each sales reps commission.  Commission is 14.5% of their individual sales.
  4. Use a formula to calculate the taxes for each sales rep.  Taxes are 22% of their individual commission.
  5. Key the word Total in cell A12 and right-align it.
  6. Use a formula to calculate the total of this month's payroll in cell E12.
  7. Use a formula to calculate the net pay for each sales rep.
  8. Use a formula to calculate the total of this month's payroll in cell E12.
  9. Format "money columns" to currency style with two decimals.
  10. Highlight the cell that has the highest commission amount for the month and fill in with light grey.  Highlight the sales reps name (with the highest commission): Italicize & Bold it.
  11. Highlight row 12 and Bold it.
  12. Highlight the information in cell A5:A11 and across through E5:E11.  Sort A-Z.
  13. Make sure columns are wide enough to show all information.
  14. Add your name to cell E1: Bold and right-align it.
  15. Select the entire work area (cells A1:E12) and go to Page Layout > Print Area > Set Print Area.
  16. Add formatting to make the document more personalized/attractive.
  17. Do a Print Preview to make sure it fits on one page.
  18. Print and turn in your spreadsheet.

Tuesday, March 12, 2013

Microsoft Word: Exploring Features


Today we are going to be practicing some techniques in Microsoft Word for formatting text, inserting clip art, inserting shapes, inserting pictures, and formatting graphics.

Adding Text:
  • Open a new Microsoft Word document
  • Go to Page Layout and set Spacing to 0 pt. (The After defaults to 10 pt.)
  • Go to Home and click the "right align" button
  • Type your name and press Enter
  • Type your period and press Enter
  • Go to Home and click the "center align" button
  • Click the "bold" button and type a title [any title] and press Enter
  • Go to Home and click the "left align" button
  • Press Tab and type an introductory paragraph then press Enter
  • Type "A few of my favorite _________:" (i.e. foods, animals, cars, etc.) and press Enter
  • Go to Home and click the Bulleted List button. Enter some of your favorites as bullet points
  • At your last bullet point, press Enter to end your bulleted list
  • Type "My class schedule:" and press Enter
  • Go to Home and click the Numbered List button. Enter your classes for each respective period.
Adding Word Art:
  1. Highlight the Title
  2. Go to Insert and click Word Art
  3. Select the style you would like to use
  4. To keep the same title, click Enter
  5. Right-click on the picture and select Text Wrapping > Square. The picture should now be "draggable"
  6. You can change the size of the graphic by dragging one of the corner "handles" or adjust the rotation of the image by grabbing the green handle
Adding Clip Art:
  1. Go to Insert and click Clip Art
  2. Type a word in the box (i.e. school, dog, etc.) and press Enter
  3. Click the Clip Art image you would like to insert into your document
  4. Notice you can't just drag the picture anywhere on the screen. To fix this, right-click on the picture and select Text Wrapping > Square. The picture should now be "draggable"
  5. You can change the size of the graphic by dragging one of the corner "handles" or adjust the rotation of the image by grabbing the green handle
Adding Pictures:
  1. Go to Insert and click Picture
  2. Click the picture you would like to insert into your document
  3. Again, right-click on the picture and select Text Wrapping > Square
  4. Again, you can change the size of the picture by dragging one of the corner "handles" or adjust the rotation of the image by grabbing the green handle
  5. There is also a "Crop" button which allows you to "cut off" sides of the picture so you can focus on a particular area
  6. You can also select border styles, 3D effects, coloring, etc.
Adding Shapes:
  1. Go to Insert and click Shapes
  2. Click the shape you would like to insert into your document (heart, arrow, smile, etc.)
  3. Drag the + shape on the screen to draw your shape
  4. Select shape color, shadow effects, 3-D effects, rotation, etc.
Taking a Screen Shot:
  1. Press the "Print Screen" button on the keyboard (some keyboards say PrtSc)
  2. Click in a locate at the bottom of your Word document
  3. Select Paste (under the Home tab) (or click CTRL+V)
  4. Crop the screen to include only a small portion.
Save and Print:
  1. Go to the "Office Button" and click Save
  2. Select Computer then ThawSpace then your own folder
  3. Type a name for your file (i.e. Microsoft Word Practice) and click Save
  4. Go to the "Office Button" and click Print then click OK

Name Tag


Name Tag 

Today we will be using Microsoft Word to create a "Name Tag"


Name Tags will look like the following:


Remember to Save your letter to your Portfolio Folder under Technology 6 as "Name Tag", print it.

Paint.Net: Replace Color (Andy Warhol Grid)


6.RST.3 - Follow precisely a multistep procedure when carrying out experiments, taking measurements, or performing technical tasks.
6.RST.7 - Integrate quantitative or technical information expressed in words in a text with
 a version of that information expressed visually (e.g., in a flowchart, diagram, model, graph, or table)


Today we will play with the Hue/Saturation Adjustments tool to “Replace Color" and create an Andy Warhol Grid.

Step I: Getting Started
  1. Click on one of the sample images below to view it full screen   


2.       Copy the image (Right Click>Save Picture As)
3.       Open Paint.Net and create a New Document
 4.      Go To EDIT> Paste As New Layer


Step II: Making a "Warhol Grid"
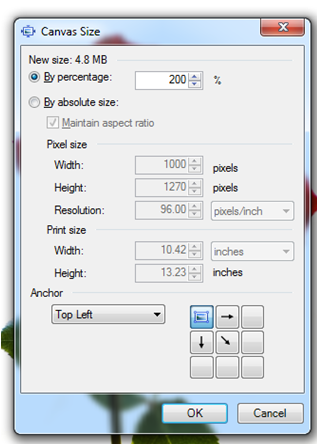
  1. Go to IMAGE > CANVAS SIZE
  2. Change by “Absolute Size” to by “Percentage"
  3. Change the percentage to 200% [percent].


     4. Click the "Upper-Left" Arrow
     5. Click OK
     6. Paste another copy of your picture
                 Edit>Past in to New Layer


          7.    Go to ADJUSTMENTS > Hue / Saturation


     8. Use the Hue / Saturation tool to select the one of the bright colors


      9. Use the arrow to drag the picture to the upper-right corner.
     10. Paste another copy of your picture
     11. Repeat Steps 7 & 8
     12.Use the arrow to drag the picture to the lower-left corner
     13.Paste another copy of your picture Repeat Steps 7 & 8
     14.Use the arrow to drag the picture to the lower-right corner. 


Step III: Finishing
     1.Save your image to your Portfolio folder in My Documents as   a .JPG title it Warhol Grid.


     2.  Log in to your blog www.Edublogs.org page 
     3. Create a New Post and insert your JPG picture 
       4. Write a quick summary of the project and what you did to get the look you came up with